![[LinuxFocus Image]](border-short.jpg)
| News Archives Companies Tips |
Using Gimpby Phillip Ross |
|
The GNU Image Manipulation Program (AKA The GIMP) has been in developement for quite awhile and early versions left a lot to be desired. GIMP has since come a long long way and is far more powerful than the early versions. Those who were turned off by the short comings of the first versions are highly encouraged to test out some of newest versions in the 0.99.xx series. I hope to demonstrate that GIMP is very much a viable tool for doing professional graphics. This article is the first in a series of articles that will show how one can use GIMP to achieve the same effects as one is capable of doing with Adobe Photoshop. Juan Manuel Sepulveda will be demonstrating some nice effects an artist can achieve with Photoshop, and I will show how to do the same thing with GIMP. In his first article he puts together a cute scene starring Daniel, his nephew. We will probably concentrate in our first few articles on explaining how to build this scene with Photoshop and Gimp. My article below explains specificly how to use GIMP to isolate Daniel from the rest of the background in the image. | |
The Cut-Away | |
| Gimp offers probably many ways to cut away specific pieces of an image from the rest of a scene. The way Juan did it could be mimiced with GIMP by using similar tools, so I will first show how one could use GIMP tools in the same manner. | |
| Warning:You must have a steady hand on a steady mouse to do this effectively. Practice makes perfect! | |
| First, look at the squares in your GIMP toolbox. There is a Free Select tool in the upper right corner. We want to use this tool first. Click on the tool to activate and we are ready to begin cutting away. | 
|
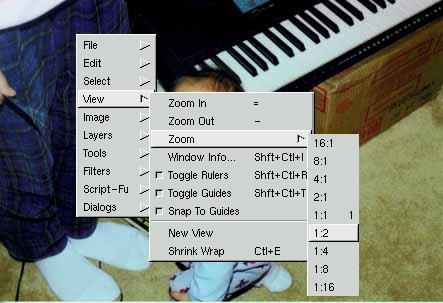 We will need the image of Daniel of course, so load it up. You might want
to zoom his image a little so you can see to cut closer. This can be
achieved by moving your mouse over the image window to give it focus, then
pressing your plus and minus key on the keyboard. Even though the plus
symbol is really shift-equals, you can just hit the key unshifted and GIMP
will know you want to zoom in. So you can use the plus and minus to get
the most comfortable zoom level and resize the window to your preference
to keep all of Daniel's image in view. If you have the image window in
focus and right-click, a small GIMP menu will popup. There is an option in
this menu called View. If you choose View, it will open up a submenu that
will give you operations such as Zoom-In and Zoom-Out, but there is also a
menu under the Zoom option that will allow you to choose the exact ratio
of the zoom. I chose the 1:2 option to do my selecting.
We will need the image of Daniel of course, so load it up. You might want
to zoom his image a little so you can see to cut closer. This can be
achieved by moving your mouse over the image window to give it focus, then
pressing your plus and minus key on the keyboard. Even though the plus
symbol is really shift-equals, you can just hit the key unshifted and GIMP
will know you want to zoom in. So you can use the plus and minus to get
the most comfortable zoom level and resize the window to your preference
to keep all of Daniel's image in view. If you have the image window in
focus and right-click, a small GIMP menu will popup. There is an option in
this menu called View. If you choose View, it will open up a submenu that
will give you operations such as Zoom-In and Zoom-Out, but there is also a
menu under the Zoom option that will allow you to choose the exact ratio
of the zoom. I chose the 1:2 option to do my selecting.
| |
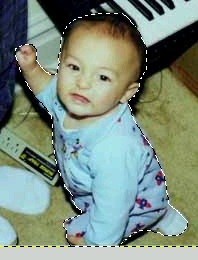 So once we have the preferred magnification and Daniel is completely
viewable, we want to begin selecting. This is where we have to have a
steady hand. Make sure you have the Free Select tool chosen and
hold down your left mouse button and move your cursor around Daniel's
outline. Wherever you move the mouse cursor, the border of the selection
you are making will be created. As soon as you leave off of the left mouse
button, the selection region will be completed. A selection line will be
drawn from where you left off the mouse button to the beginning of the
region we selected. So go ahead and make the selection by moving the
whole way around Daniel's image, outlining his cute little head and
pajama outfit, then ending back where you started. When you leave off
the button, his entire image should be outlined, and a moving dotted line
will show the border of the selection.
So once we have the preferred magnification and Daniel is completely
viewable, we want to begin selecting. This is where we have to have a
steady hand. Make sure you have the Free Select tool chosen and
hold down your left mouse button and move your cursor around Daniel's
outline. Wherever you move the mouse cursor, the border of the selection
you are making will be created. As soon as you leave off of the left mouse
button, the selection region will be completed. A selection line will be
drawn from where you left off the mouse button to the beginning of the
region we selected. So go ahead and make the selection by moving the
whole way around Daniel's image, outlining his cute little head and
pajama outfit, then ending back where you started. When you leave off
the button, his entire image should be outlined, and a moving dotted line
will show the border of the selection.
| |
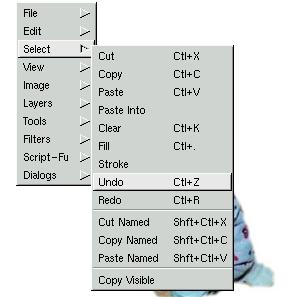
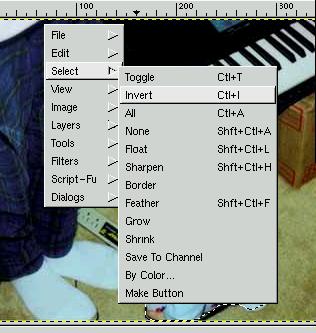 From here, the region of the image that is selected includes everything
INSIDE the moving dotted line. We want to cut away everything BUT the
region inside, so we need to "invert" the selection so that everything but
Daniel's image is selected. This is simple. Make sure your mouse is over
top of the image region and click on your right mouse button. Choose the
Select submenu, then choose the Invert option. Take note that there by
the Insert option is a hotkey sequence. Control-I is the hotkey for
inverting the selection. Rather than choosing the option from a menu you
can just use the hotkey sequence to do the same thing. So do whichever
you want to do to get the selection inverted. After you choose to invert,
you will see that the dotted moving line is still around Daniel, but there
is also a moving dotted line around the parameter of the image. If you
dont see one, during the magnification view process it is possible that
you may have made the image bigger than the window in which you are
viewing the image, so you will have to use the scroll bars to scroll over
to the side of the actualy image. Once you have both sets of moving
dotted lines, you know that everything between these dotted lines is
selected. Hopefully everything between the dotted lines corresponds to
all of the image except Daniel.
From here, the region of the image that is selected includes everything
INSIDE the moving dotted line. We want to cut away everything BUT the
region inside, so we need to "invert" the selection so that everything but
Daniel's image is selected. This is simple. Make sure your mouse is over
top of the image region and click on your right mouse button. Choose the
Select submenu, then choose the Invert option. Take note that there by
the Insert option is a hotkey sequence. Control-I is the hotkey for
inverting the selection. Rather than choosing the option from a menu you
can just use the hotkey sequence to do the same thing. So do whichever
you want to do to get the selection inverted. After you choose to invert,
you will see that the dotted moving line is still around Daniel, but there
is also a moving dotted line around the parameter of the image. If you
dont see one, during the magnification view process it is possible that
you may have made the image bigger than the window in which you are
viewing the image, so you will have to use the scroll bars to scroll over
to the side of the actualy image. Once you have both sets of moving
dotted lines, you know that everything between these dotted lines is
selected. Hopefully everything between the dotted lines corresponds to
all of the image except Daniel.
| |
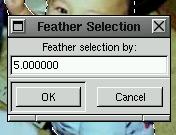 Once we have the correct selection, which is everything BUT
daniel's image, we want to cut it away. Before we do cut away though, we
should "feather" the selection so that the border where the cutaway
happens is not so chunky and pixelated. By feathering it we will make it
smoother. Right click to get our menu, choose the Select submenu and
then choose Feather. The hotkey for this is Shift-Control-F. After you
do this the Feather Selection dialog box appears and will allow you to
choose an amount to feather the selection by. You can experiment around
with this amount to see which produces the results you like best. I used
5 for my amount.
Once we have the correct selection, which is everything BUT
daniel's image, we want to cut it away. Before we do cut away though, we
should "feather" the selection so that the border where the cutaway
happens is not so chunky and pixelated. By feathering it we will make it
smoother. Right click to get our menu, choose the Select submenu and
then choose Feather. The hotkey for this is Shift-Control-F. After you
do this the Feather Selection dialog box appears and will allow you to
choose an amount to feather the selection by. You can experiment around
with this amount to see which produces the results you like best. I used
5 for my amount.
| |
You wont be able to see the results until we clear the selection away. If you dont like the results after clearing the selection away, you can use the Undo option twice in a row to undo the clearing of the selection then the feathering of the selection. From there you can choose the Feather option over again and choose a new amount to feather by. To actually clear the selction away, you want to go to the menu by right clicking, choose the Edit submenu, then choose Clear. Control-K is the hotkey to clear. If you dont like the results you can go back and play with the feathering amount by going to the menu, choosing the Edit option, and then choosing Undo. The hotkey for Undoing is Conrtol-Z. After you clear away, you should have an image with a smoothly cutaway image of Daniel. Like I said, you have to have a steady hand to make this work so practice makes perfect. | |
The Masking | |
| For those of you who dont have steady hands (this includes me), there is another method that I prefer for cutting away backgrounds to images which I'll explain now. This method involves the Layers/Channels dialog box. | |
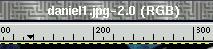 First, we want to load the picture of Daniel. The particular
image I have is in JPG format, and Gimp loads JPGs in RGB truecolor
format. In the title of the image window it will specify which format the
image is in between the parantheses. If it were loaded from some other
format, such as GIF, Gimp might load it as an indexed color image so you
would have to convert it to RGB for our purposes. To convert from indexed
color to RGB, right click on the image window and choose the Image
submenu. In this submenu is RGB, Greyscale, and Indexed options. Just
choose the format you want to convert it to...for our demo we want RGB.
After you click on that option, our image is converted to RGB. Since RGB
format is capable of displaying more colors, converting from RGB to
indexed and back may reduce the quality of the image. So if you start in
RGB format, stay in RGB format if possible.
First, we want to load the picture of Daniel. The particular
image I have is in JPG format, and Gimp loads JPGs in RGB truecolor
format. In the title of the image window it will specify which format the
image is in between the parantheses. If it were loaded from some other
format, such as GIF, Gimp might load it as an indexed color image so you
would have to convert it to RGB for our purposes. To convert from indexed
color to RGB, right click on the image window and choose the Image
submenu. In this submenu is RGB, Greyscale, and Indexed options. Just
choose the format you want to convert it to...for our demo we want RGB.
After you click on that option, our image is converted to RGB. Since RGB
format is capable of displaying more colors, converting from RGB to
indexed and back may reduce the quality of the image. So if you start in
RGB format, stay in RGB format if possible.
| |
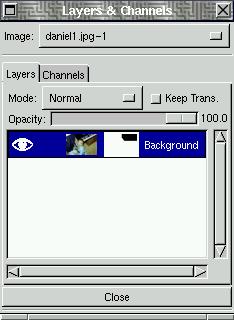
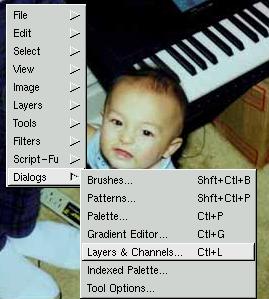 Once we know the image is in RGB format, we're almost ready to
do the cutaway. Right click on the image window and choose the Dialog
submenu. In that submenu choose the Layers and Channels option (hotkey
for this is Control-L). The Layers/Channels dialog box appears and we are
ready to begin learning to use it. This dialog box allows us to edit
image layers and image channels. For now we will concentrate on layers.
Once we know the image is in RGB format, we're almost ready to
do the cutaway. Right click on the image window and choose the Dialog
submenu. In that submenu choose the Layers and Channels option (hotkey
for this is Control-L). The Layers/Channels dialog box appears and we are
ready to begin learning to use it. This dialog box allows us to edit
image layers and image channels. For now we will concentrate on layers.
| |
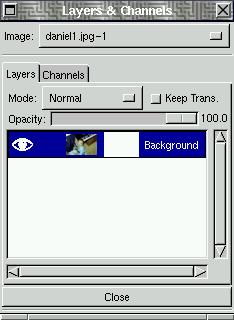
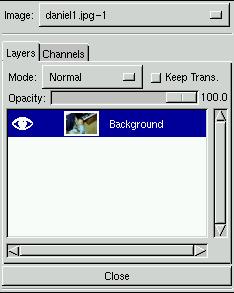 An image can have multiple layers in Gimp and each layer can be
edited independantly of one another. Right now you should only see one
layer which will have a very small version of the Daniel image. It will
have an eyeball icon to the left and the layer title to the right. The
layer title will be "Background." The Eyeball icon is there to show us
that the layer is currently visible in the image window. If we have
multiple layers, we can make some visible and some not by toggling the
eyeball icon for that layer on or off. You can toggle by clicking on the
icon (or where the icon should be if there is none) but for now, since we
are working on only a single layer, this wont work for us. For now we
will only be working with one layer, but we will be doing operations on
the layer that require this layer dialog box.
An image can have multiple layers in Gimp and each layer can be
edited independantly of one another. Right now you should only see one
layer which will have a very small version of the Daniel image. It will
have an eyeball icon to the left and the layer title to the right. The
layer title will be "Background." The Eyeball icon is there to show us
that the layer is currently visible in the image window. If we have
multiple layers, we can make some visible and some not by toggling the
eyeball icon for that layer on or off. You can toggle by clicking on the
icon (or where the icon should be if there is none) but for now, since we
are working on only a single layer, this wont work for us. For now we
will only be working with one layer, but we will be doing operations on
the layer that require this layer dialog box.
| |
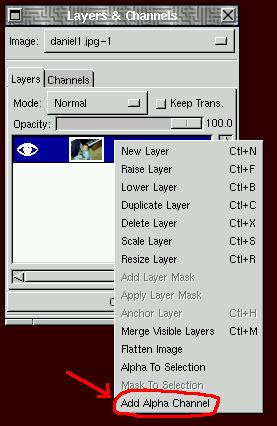
Right now the image of Daniel should be in RGB format. RGB, of course, stand for Red-Green-Blue. Each pixel in the image has a seperate value for red, green, and blue and these values combined control the color of the corresponding pixel. If you dont already know this, it is advised to try to find a tutorial on color theory. What we need to do is get the image into a format that has one additional value other than red, green, or blue. This additional value is called an "alpha" value. The alpha value, or alpha channel, can be used for many purposes, but for our purposes we will be using it as an "opacity value." The more opacity a pixel has, the less you can see through it. If a pixel as zero opacity, you can see completely through it, you cant even see the pixel itself. In the Layers/Channels dialog box you'll find the opacity slidebar, and this controls the opacity for the entire layer. If you slide it to the left, the opacity value goes down and you can see through the image. This opacity value controls to what degree the image can be seen through, or in other words, how transparent the image is. What you can do is create multiple layers in an image and have a layer be semi-transparent. If a layer is semi-transparent, you will be able to see through it to the next layer. This can make for some pretty neat effects, but we wont be using it right now. Also, GIMP shows that part of an image is transparent by showing a grey checkerboarded pattern. You will see what I mean when you begin working with transparency. Instead of using the opacity slidebar to make the layer transparent, we will only be making part of the image transparent, sepcifcly everything except for the image of Daniel himself. In order to do this, we need to give the the image an alpha channel. To do this, position your mouse cursor overtop of the layer title and right click. This will produce a menu with some options. The option we want to choose is "Add Alpha Channel." After we choose this option, the alpha channel will be added and you will see in the image window's title bar it now says (RGB-alpha). | |
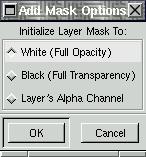 Now we can add a "layer mask" to help us with our cutaway. A layer mask
will allow us to effectivly mask out the part of the image that we dont
want. We want to mask out everything except Daniel's image. We can add a
layer mask by right-clicking on the layer title and choosing the Add Layer
Mask option. After choosing this option, you should get an "Add Mask
Options" dialog box. This will allow you to choose what value the layer
mask will have initially. You might not know what to choose right now and
what will produce what effects so just choose White (Full Opacity) for
right now.
Now we can add a "layer mask" to help us with our cutaway. A layer mask
will allow us to effectivly mask out the part of the image that we dont
want. We want to mask out everything except Daniel's image. We can add a
layer mask by right-clicking on the layer title and choosing the Add Layer
Mask option. After choosing this option, you should get an "Add Mask
Options" dialog box. This will allow you to choose what value the layer
mask will have initially. You might not know what to choose right now and
what will produce what effects so just choose White (Full Opacity) for
right now.
| |
 After choosing the initial value from the dialog box and clicking
OK, you will see in the Layers/Channels dialog box that a new white image
was created and displayed between the original image of Daniel and the
layer title. This is the layer mask that we just created. Click on the
white layer mask image in the Layers/Channels dialog box to activate it.
If nothing happens, try clicking on the layer image right beside it and
you should see a white border leave the layer mask image and go to the
layer image. This shows that the layer image is now active, and you'll
want to click back on the layer mask to activate it.
After choosing the initial value from the dialog box and clicking
OK, you will see in the Layers/Channels dialog box that a new white image
was created and displayed between the original image of Daniel and the
layer title. This is the layer mask that we just created. Click on the
white layer mask image in the Layers/Channels dialog box to activate it.
If nothing happens, try clicking on the layer image right beside it and
you should see a white border leave the layer mask image and go to the
layer image. This shows that the layer image is now active, and you'll
want to click back on the layer mask to activate it.
| |
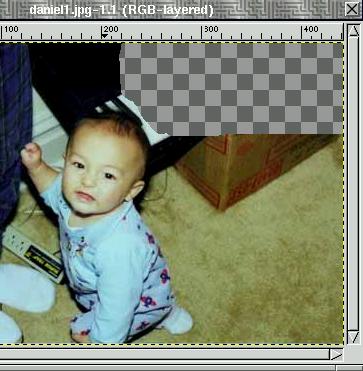
| After activating the layer mask, you can draw on it to mask out the layer image. Where you draw on the layer mask with BLACK, the layer image will be made transparent. Where you draw on the mask with WHITE, the image will be made opaque. By using different shades of grey you can make the image semi-transparent. The darker the shade if grey, the more transparent it will become. You may also draw on the layer mask with colors to mask out specific color channels, but we dont need to do that right now. For now we will work with black and white to mask out the image. If you look below you will see in the Layers/Channels dialog box that I'm painting the layer mask black and it is turning the image transparent. | |
| |
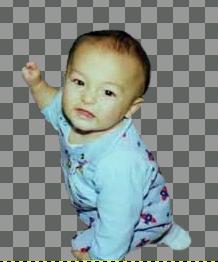 From here you can use any brushes you want to draw around Daniel's
image in black, and it will make the image transparent where you draw
on the layer mask. I used the Circle Fuzzy (07) 7x7 brush to draw close
against Daniel and then used bigger brushes to clear away the rest. I
like this method much better because if I mask out something I didn't want
to by accident (because my hand is not so steady) I can just draw back
over it with white and the image will reappear. To the right is my
finished masking.
From here you can use any brushes you want to draw around Daniel's
image in black, and it will make the image transparent where you draw
on the layer mask. I used the Circle Fuzzy (07) 7x7 brush to draw close
against Daniel and then used bigger brushes to clear away the rest. I
like this method much better because if I mask out something I didn't want
to by accident (because my hand is not so steady) I can just draw back
over it with white and the image will reappear. To the right is my
finished masking.
| |
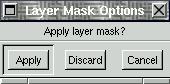 We have our mask now, but we still have to apply it to actually commit the
masking to the image. This is done easily with the Apply Layer Mask
option in the Layers/Channels dialog box menu. When we choose this option
from the menu, the layer mask options dialog box will appear. You can
choose to apply the mask or just discard it if we dont want it anymore.
We do want it, so we choose apply, and the part of the image that we
masked is now made transparent. Now we can create additional layers
underneath this layer and they will show through the transparent part of
this layer. We can put our background and text in layers underneath
this one, but we'll save that for next issue.
We have our mask now, but we still have to apply it to actually commit the
masking to the image. This is done easily with the Apply Layer Mask
option in the Layers/Channels dialog box menu. When we choose this option
from the menu, the layer mask options dialog box will appear. You can
choose to apply the mask or just discard it if we dont want it anymore.
We do want it, so we choose apply, and the part of the image that we
masked is now made transparent. Now we can create additional layers
underneath this layer and they will show through the transparent part of
this layer. We can put our background and text in layers underneath
this one, but we'll save that for next issue.
| |
- Read other articles in this series.
- Consult the Gimp user Manual.
- Other articles by the same author: Hardware Review: OpenGL & GLUT with Voodoo 3Dfx in Mind, Hardware Review: 3Dfx Graphics Card.
This website is mantained by Miguel A Sepulveda.